Advanced Variant Filters
Mosaic provides a number of ways to filter variants and the options available to you will depend on the annotations, predefined filters and attributes that are attached to your data. This tutorial will demonstrate using predefined filters, but you may not be able to recreate the exact steps if you don't have the same data available to you.
For this tutorial, you need to be on the Variants page of a project. The variant filtering options can all be found in the Filters button at the top right of the variants table.
Advanced Variant Filters
The Advanced Variant Filters modal allows you to apply as many filters as like at the same time. There are a number of different types of filters that can be applied, so we'll walk through a couple of them.
Numerical Annotations
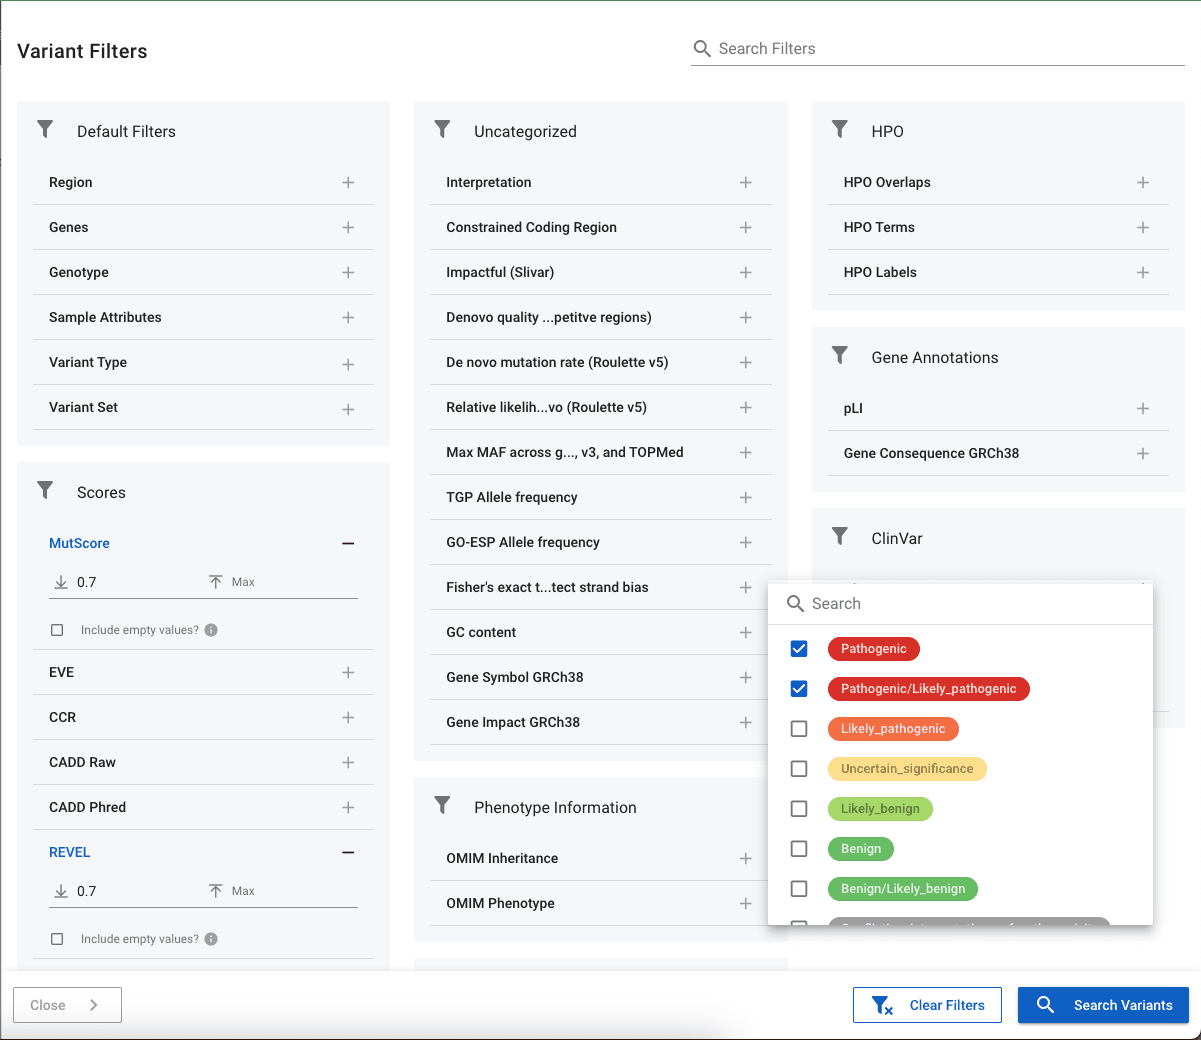
Many standard annotations (e.g. gnomAD allele frequencies, pLI scores etc.) can be filtered by applying minimum and / or maximum values. In the image below, the REVEL and MutScore annotations have both been given a minimum value of 0.7. Under these numerical annotations, you also have the option to Include empty values? If the box is checked, the filter will return all variants whose annotations fall in the range given, and variants that do no have a value. This is particularly useful for annotations such as gnomAD where the absence of the annotation likely means that the variant has not been seen in gnomAD and so is rare.

Categorical Annotations
Annotations such as ClinVar allow you to pick the labels to return. In the image above, we have chosen to return variants that are listed as Pathogenic or Likely_pathogenic. Where possible, categorical annotations have their severity defined and so will appear in coloured badges and ordered according to severity. This can be seen with ClinVar variants where the Pathogenic and Likely_pathognic variants appear in red at the top of the list.
Special Filters
There are a number of special filters in the Default Filters section. Here you can choose to view variants in a specific gene or region.
Genotype filters
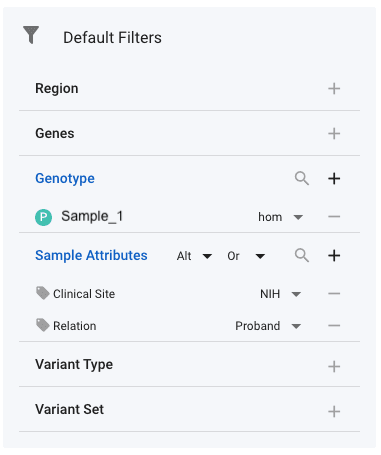
To apply genotype filters, select Genotype under Default Filters, then Sample and then select the name of the sample(s) whose genotypes you are interested in. In the image below, you can see that sample with name Sample_1 has been selected. Next to the sample, you have the option of four genotypes:
- Alt (het or hom) - the sample has an alt allele, e.g. can be a heterozygote or homozygous alternate
- Hom - the sample is homozygous for the alternate allele
- Het - the sample is a heterzygote
- Ref / no-call - the sample is either a called homozygous reference, or no-call is available for the sample
These genotype filters can be used in family projects to identify, e.g. de novo mutations by setting the proband genotype to alt and both parents to ref.

Filter on Sample Attributes
Some samples have associated attributes that can be useful to filter. For example, the Undiagnosed Diseases Network (UDN) has multiple clinical sites, each of which have a number of participants assigned to then. A common query is to find all variants that a proband from their own site has - in combination with some standard annotation filters. This can be achieved by selecting the relevant sample attributes in the Default Filters section. In the image above, we have selected the Clinical Site and the Relation attributes. Next to each of these, the required values have then been set. With the genotype set to Alt at the top of the Sample Attributes filter, this filter will return all variants for which an NIH proband has an alternate allele (either het or hom). It is recommended that you use the Or setting next to the genotype setting. Setting And will regularly result in zero variants. In this example, the effect or And and Or are as follows:
- Or - if any NIH Proband has an alternate allele for a variant, that variant will be returned
- And - only variants with ALL samples having an alternate allele are NIH Probands will be returned